Object:
Structure light modeling is a new method to get 3D model using simple tools: camera and projector.
The projector emits various kinds of light stripes or patterns so that the reflection of light in objects are captured and the depth of objects can be calculated.
We want to get a complete 3D model, which means we need to capture for several times in each direction so that the pieces could be merged together.
Thanks for Brown Univ mesh group, we set up a similar experiment environment to get 3D model.
http://mesh.brown.edu/calibration/software.html
Tools we use :
Laptop, camera(Logitech C920,resolution 2304*1536), projector(Asus S1,resolution 854*480), toy models, chessboard(for calibration), rotating plate(controlled by Arduino using serial port)
Win7+QT4.8.4+VS 2010+OpenCV2.4.9 for compiling QT user inteface
Win10+OpenCV1.0+VS 2010 for compiling capture and calibrate program
Win10+OpenCV2.4.9+PCL 1.7.2+VS 2013 for compiling merge and visualization program
Win 10+Arduino 1.6.5 for compiling and downloading turing program in Arduino
Win 10+VS 2010 for compiling serial port communication to control rotating plate
Steps:
The first step is to calibrate for the projector and camera.
The image captured and the screen projected is not in ideal flat and square size, especially the margin of the view. So the calibration is essential for the high accuracy.
The projector projects a set of patterns to the chessboard for at least three times, each time the board need to change a position.
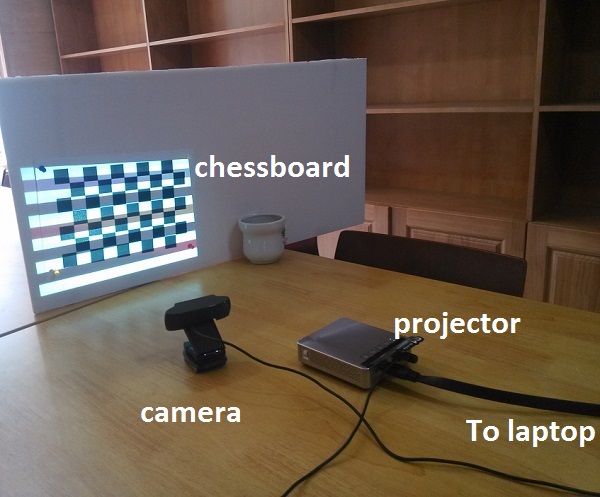
The placement of these tools(captured in our common room under dorm)
The second step is to capture objects in structure light. The light pattern is the same.
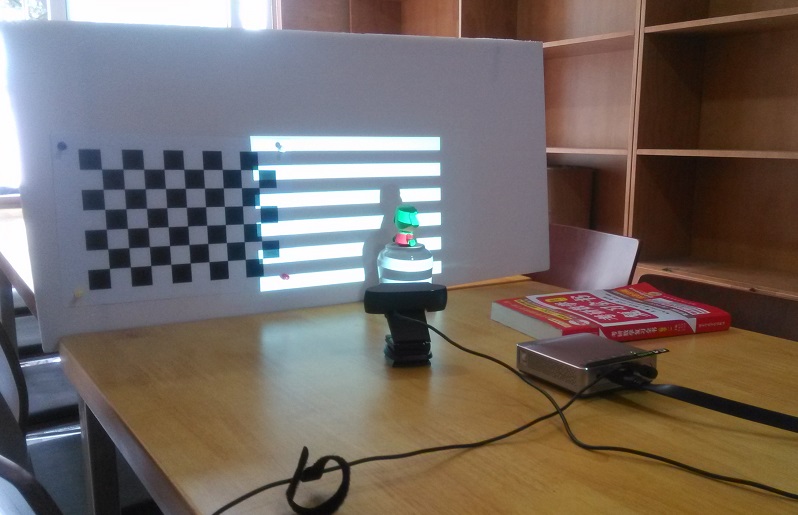
The stripe is twisted on the object, so the depth info can be calculated
The stripe is horizontal then vertical, and become denser and thiner each time until the lines cannot be identified.
With a set of 42 pictures captured for each light pattern, the point cloud is generated.
Sample point cloud file ![]() test.rar
test.rar
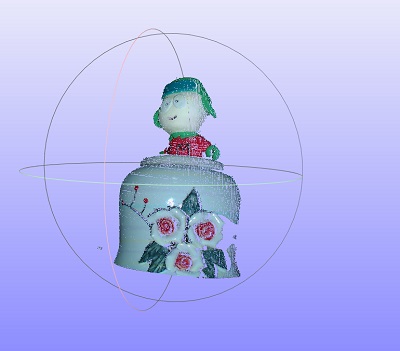
The result shown in MeshLab, a software to view and edit point cloud files
The third step is to capture the object in all rotation, so that the complete 3D model can be acquired.
A part of common areas should be used as reference, so we cannot just capture front and back, just two positions of the same object. In our test, we use 30 degree as a rotation, so 12 positions are captured in the way similar to step 2.
But before the merge, preprosessing is needed. The background board should be removed and noise points should be filtered. The passthrough filter is used to remove points whose depth is larger than a threshold, and the statistical filter is used to remove points whose closest neighbours is larger than another threshold.
After that, ICP algorithm is used to calculate the relations between two position and merge them together.
Now we get a pretty nice point cloud, but in order to make the surface smooth or generate an 'std' file for 3D printing, Greedy Triangulation is used for smooth visualization.
Sample point cloud merged together: ![]() RegisteredFiltered.rar
RegisteredFiltered.rar
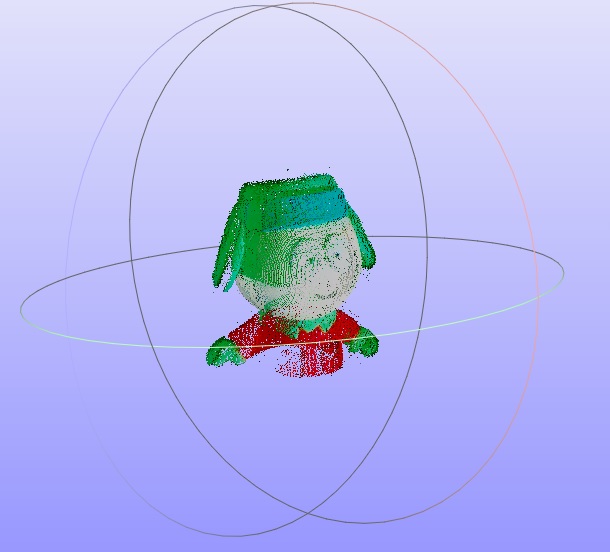
After mergence(download attachment above to see all it in all directions)
Software:
Based on the open source code given by Brown group, we tailored our need to re-design and implement the software again.
The project consists of one user interface and several command line executable programs, using buttons to connect together.
Mainly based on QT and use QProcess to link the user interface and the command line program.
Like:
QProcess::startDetached("cvStructuredLight",QStringList("s"+config.value("main/turn_deg").toString()));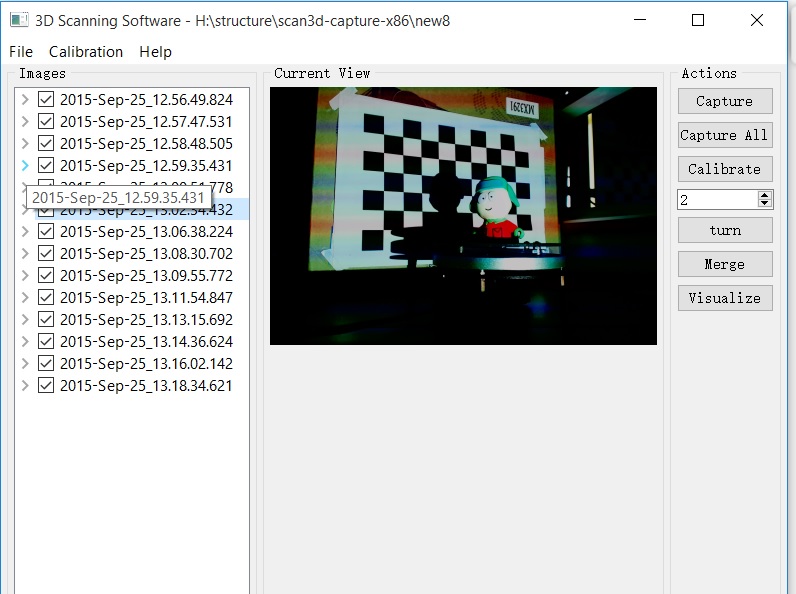
user interface
All the source:
![]() scan3d-capture-src-final_all.rar
scan3d-capture-src-final_all.rar
Noted that in bin folder, many exe is not executable other than my environment and should be recompiled.
How to use
First click 'Calibrate' for initial setup(do not need again unless the position of camera and projector is changed)
Click 'capture' to start capturing. Adjust camera and projector gain then press any key in the window.
Spin the number to adjust the rotating plate and click 'turn'.
Capture again until rotated all the degree.
Click merge after several merge.
Pay much attention to xml files in the bin folder. Understand and adjust them correctly before you click any button. 'config.xml' for calibrate and capture, 'config2.xml' for merging.
NOTE for Windows user
The complilation of the software uses QT, and there are many version of QT available.
In my attempt, I tried many of the QT versions, and the only workable one is like what said in INSTALL.txt in the source code package.
---- Microsot Windows 7 - Visual Studio 2010 ----
1) Install Qt (from binaries)
Download http://releases.qt-project.org/qt4/source/qt-win-opensource-4.8.4-vs2010.exe
Install to C:\Qt\4.8.4
Add C:\Qt\4.8.4\bin to PATH
2) Install OpenCV 2.4.3 (from binaries)
Download http://sourceforge.net/projects/opencvlibrary/files/opencv-win/2.4.3/OpenCV-2.4.3.exe
Extract/Install to C:\opencv\opencv-2.4.3
Add C:\opencv\opencv-2.4.3\opencv\build\x86\vc10\bin to PATH
3) Build scanning software
cd scan3d-capture/build
qmake
nmake release
Windows 10 can complile but the program went wrong when capturing and opening new directory.
So I personaly use VMWare and install exactly the same software and platform as instructed.
Opencv 2.4.3 is not online now but 2.4.9 is also workable(I have tested)
Use Qt 4.8.4 command prompt instead of QT creator in higher version(I cannot compile successfully).
Use the same version of libs in all components, in this case, I use Visual Studio 2010, so Qt and Opencv should also be this 2010 version
When installing PCL package, I highly recommend using all in one installer. The official version of all in one installer is only in 1.6, a website for higher version:http://unanancyowen.com/?p=1255&lang=en
I tried to compile the source code of 1.7.1 by Visual Studio 2010, I tried to compiled and installed the PCL with success, but when using such PCL in project, I failed to compile my project using PCL and Opencv at the same time.
Build projects of PCL with official instruction http://pointclouds.org/documentation/tutorials/using_pcl_pcl_config.php#using-pcl-pcl-config , but still I need to add many libs in Visual Studio project. The complete list of libs I use in compiling PCL projects of merging multiple faces together(Some libs already existed when building the projects, some of them are not needed).
kernel32.lib
user32.lib
gdi32.lib
winspool.lib
shell32.lib
ole32.lib
oleaut32.lib
uuid.lib
comdlg32.lib
advapi32.lib
D:\Program Files (x86)\PCL 1.7.2\3rdParty\Boost\lib\libboost_system-vc120-mt-gd-1_55.lib
D:\Program Files (x86)\PCL 1.7.2\3rdParty\Boost\lib\libboost_filesystem-vc120-mt-gd-1_55.lib
D:\Program Files (x86)\PCL 1.7.2\3rdParty\Boost\lib\libboost_thread-vc120-mt-gd-1_55.lib
D:\Program Files (x86)\PCL 1.7.2\3rdParty\Boost\lib\libboost_date_time-vc120-mt-gd-1_55.lib
D:\Program Files (x86)\PCL 1.7.2\3rdParty\Boost\lib\libboost_iostreams-vc120-mt-gd-1_55.lib
D:\Program Files (x86)\PCL 1.7.2\3rdParty\Boost\lib\libboost_mpi-vc120-mt-gd-1_55.lib
D:\Program Files (x86)\PCL 1.7.2\3rdParty\Boost\lib\libboost_serialization-vc120-mt-gd-1_55.lib
D:\Program Files (x86)\PCL 1.7.2\3rdParty\Boost\lib\libboost_chrono-vc120-mt-gd-1_55.lib
D:\Program Files (x86)\PCL 1.7.2\lib\pcl_common_debug.lib
D:\Program Files (x86)\PCL 1.7.2\lib\pcl_features_debug.lib
D:\Program Files (x86)\PCL 1.7.2\lib\pcl_io_debug.lib
D:\Program Files (x86)\PCL 1.7.2\lib\pcl_io_ply_debug.lib
D:\Program Files (x86)\PCL 1.7.2\lib\pcl_kdtree_debug.lib
D:\Program Files (x86)\PCL 1.7.2\lib\pcl_keypoints_debug.lib
D:\Program Files (x86)\PCL 1.7.2\lib\pcl_ml_debug.lib
D:\Program Files (x86)\PCL 1.7.2\lib\pcl_outofcore_debug.lib
D:\Program Files (x86)\PCL 1.7.2\lib\pcl_people_debug.lib
D:\Program Files (x86)\PCL 1.7.2\lib\pcl_recognition_debug.lib
D:\Program Files (x86)\PCL 1.7.2\lib\pcl_registration_debug.lib
D:\Program Files (x86)\PCL 1.7.2\lib\pcl_sample_consensus_debug.lib
D:\Program Files (x86)\PCL 1.7.2\lib\pcl_segmentation_debug.lib
D:\Program Files (x86)\PCL 1.7.2\lib\pcl_stereo_debug.lib
D:\Program Files (x86)\PCL 1.7.2\lib\pcl_surface_debug.lib
D:\Program Files (x86)\PCL 1.7.2\lib\pcl_tracking_debug.lib
D:\Program Files (x86)\PCL 1.7.2\lib\pcl_filters_debug.lib
D:\Program Files (x86)\PCL 1.7.2\lib\pcl_search_debug.lib
D:\Program Files (x86)\PCL 1.7.2\lib\pcl_io_debug.lib
D:\Program Files (x86)\PCL 1.7.2\lib\pcl_octree_debug.lib
D:\Program Files (x86)\PCL 1.7.2\lib\pcl_visualization_debug.lib
D:\Program Files (x86)\PCL 1.7.2\3rdParty\VTK\lib\vtk-5.10\vtkCharts-gd.lib
D:\Program Files (x86)\PCL 1.7.2\3rdParty\VTK\lib\vtk-5.10\vtkViews-gd.lib
D:\Program Files (x86)\PCL 1.7.2\3rdParty\VTK\lib\vtk-5.10\vtkInfovis-gd.lib
D:\Program Files (x86)\PCL 1.7.2\3rdParty\VTK\lib\vtk-5.10\vtkWidgets-gd.lib
D:\Program Files (x86)\PCL 1.7.2\3rdParty\VTK\lib\vtk-5.10\vtkHybrid-gd.lib
D:\Program Files (x86)\PCL 1.7.2\3rdParty\VTK\lib\vtk-5.10\vtkVolumeRendering-gd.lib
D:\Program Files (x86)\PCL 1.7.2\3rdParty\VTK\lib\vtk-5.10\vtkRendering-gd.lib
D:\Program Files (x86)\PCL 1.7.2\3rdParty\VTK\lib\vtk-5.10\vtkGraphics-gd.lib
D:\Program Files (x86)\PCL 1.7.2\3rdParty\VTK\lib\vtk-5.10\vtkImaging-gd.lib
D:\Program Files (x86)\PCL 1.7.2\3rdParty\VTK\lib\vtk-5.10\vtkIO-gd.lib
D:\Program Files (x86)\PCL 1.7.2\3rdParty\VTK\lib\vtk-5.10\vtkFiltering-gd.lib
D:\Program Files (x86)\PCL 1.7.2\3rdParty\VTK\lib\vtk-5.10\vtkCommon-gd.lib
D:\Program Files (x86)\PCL 1.7.2\3rdParty\VTK\lib\vtk-5.10\vtksys-gd.lib
ws2_32.lib
opencv_ml249d.lib
opencv_calib3d249d.lib
opencv_contrib249d.lib
opencv_core249d.lib
opencv_features2d249d.lib
opencv_flann249d.lib
opencv_gpu249d.lib
opencv_highgui249d.lib
opencv_imgproc249d.lib
opencv_legacy249d.lib
opencv_objdetect249d.lib
opencv_ts249d.lib
opencv_video249d.lib
opencv_nonfree249d.lib
opencv_ocl249d.lib
opencv_photo249d.lib
opencv_stitching249d.lib
opencv_superres249d.lib
opencv_videostab249d.lib
opencv_objdetect249.lib
opencv_ts249.lib
opencv_video249.lib
opencv_nonfree249.lib
opencv_ocl249.lib
opencv_photo249.lib
opencv_stitching249.lib
opencv_superres249.lib
opencv_videostab249.lib
opencv_calib3d249.lib
opencv_contrib249.lib
opencv_core249.lib
opencv_features2d249.lib
opencv_flann249.lib
opencv_gpu249.lib
opencv_highgui249.lib
opencv_imgproc249.lib
opencv_legacy249.lib
opencv_ml249.lib
In all, compiling code in Windows is very tough, so it is recommeded using Linux platform where using QT is with much convenience.